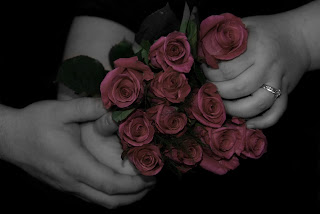
 Both of these images are converted from the same file. The second image has slightly 'stronger' red tone added to the flowers than the first image.
 Photoshop steps:
- Drag the black and white image to the color image and rename each layer to identify the layer [e.g. the bottom layer = color, the next layer = b&w, etc.
- Create a mask on the b&w layer. Hit the 'B' key [brush] and ensure black is selected in the color pallet.
- Adjust the brush size to a comfortable size to 'paint' over the flowers. The shortcut key for adjusting the brush size is the '[' and ']' keys.
- Paint over the flowers and the color from the first layer will show through to the second layer. The trick is not to paint too much to the hands or clothing. Use the 'z' key to zoom in and out when needed.
- In this image, I wanted to 'black' out the couple's jeans to add some 'pop' to the flowers. I created a layer above the black and white layer and painted black over the jeans. I did not paint the black on the black and white layer because I did not want to alter the 'original' layer.
Thanks for viewing and remember, get out and capture the beauty of life!


No comments:
Post a Comment